Using Small Business Server 2008 Companyweb with TS Web Access
TS Web Access is a web interface to applications on a Terminal Server. Microsoft’s Small Business Server ships with a SharePoint application pre-installed called Companyweb. This article is a how-to description on merging these two applications. The process is somewhat described in this TechNet Article. However, this article is for standalone SharePoint installations. It does not take in the nuances of the Small Business Server Companyweb SharePoint application.
Not covered in this article is installing and configuring a Terminal Server. I am assuming you already have a Terminal Server deployed and you have enabled TS Web Access. If not, there is a guide here, on TechNet, to help you.
Once TS Web Access is working for you, the first step in integrating it to Companyweb is into install the TS Web Access Role Service. Open the Server manager and expand Roles. Then highlight Terminal Services. Scroll down until you see Role Services.

TS Web Access will show to be “Not Installed”. Highlight TS Web Access and click on Add Role Service.

Put a check mark by TS Web Access. Then Click Next.

Confirm the installation.

TS Web Access Role Service is successfully installed.
By adding this Role Service, a new entry is created in IIS. It is “TS” and is located in the Default Web Site directory.

If you plan to access the TS Web Access from outside the network, like from home or a hotel, it is better to move this to the SBS Web Applications folder. Located there, it will use the same SSL connections as Companyweb.
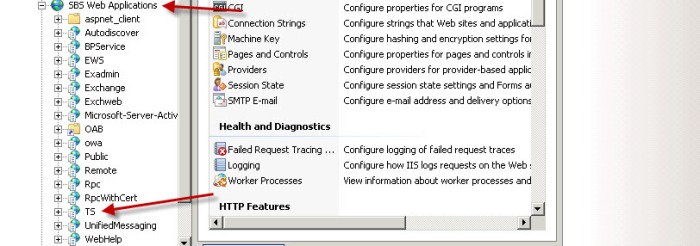
The next step is to register the TS Web Access Web Part assembly and name space as a Safe Control. To do this, the following line needs to be added to the Companyweb web.config file.
<SafeControl Assembly=”TSPortalWebPart, Version=6.0.0.0, Culture=neutral, PublicKeyToken=31bf3856ad364e35″ Namespace=”Microsoft.TerminalServices.Publishing.Portal” TypeName=”*” Safe=”True” AllowRemoteDesigner=”True” />
For Companyweb, the web.config file is located C:\Program Files\Windows Small Business Server\Bin\webapp\InternalWebSite
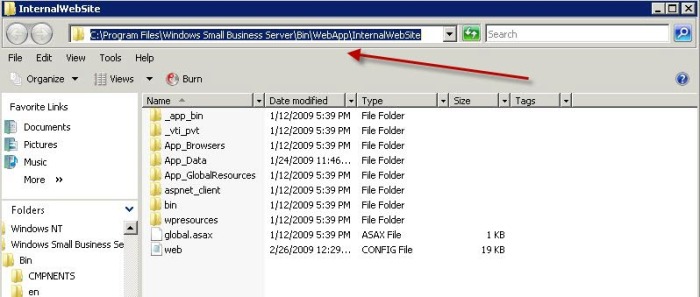
Open the web.config file with Notepad. Insert the lines above in the <SafeControl> section as a single line.
The next step is to create a folder for the Web Part images. The folder needs to be at
C:\Program Files\Common Files\Microsoft Shared\Web Server Extensions\wpresources\tsportalwebpart\6.0.0.0__31bf3856ad364e35\images
Notice the double”__” in “6.0.0.0__31bf3856ad364e35”. That is not a typo. They need to be there.

A command line will work, or if you prefer, you can do it with Windows Explorer.

The folder permission needs to be changed from the default, and Network Services needs to be added with Full Control.
Now we are ready for the good stuff. If everything up to this point has gone well, you now open Companyweb.

Click on Site Actions, and then again on Site Settings.

Go To Web Parts underneath Galleries.
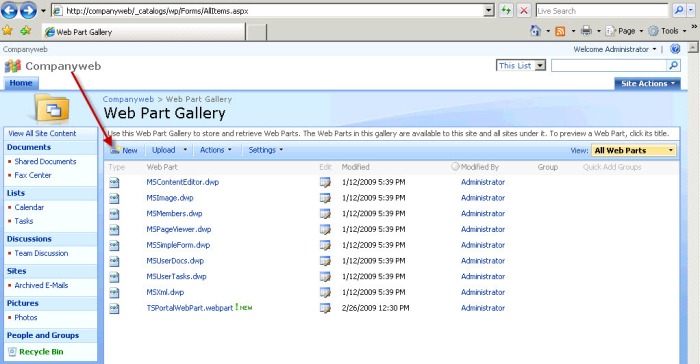
Select “New”.

At the bottom of the page you should see the new Web Part. Put a checkmark in the box.
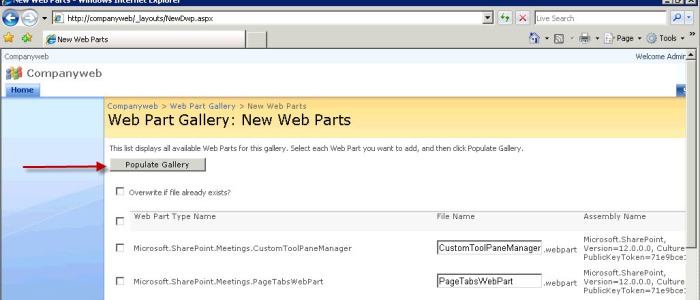
At the top of the page, click on Populate Gallery. Then click on the Home tab.

Back to the Companyweb home page, click on Site Settings and then Edit Page.

Pick a location for the Web Part. As you can see the choice is either Left or Right. I selected Left.

Now you need to tell the Web Part where the Terminal Server is located so it can be populated. Click on the down tick by Edit and slect Modify Shared Web Part.

In the Terminal Server name box, type in the name of the terminal server that will be used. Then click Apply

Then Select Exit Edit Mode.
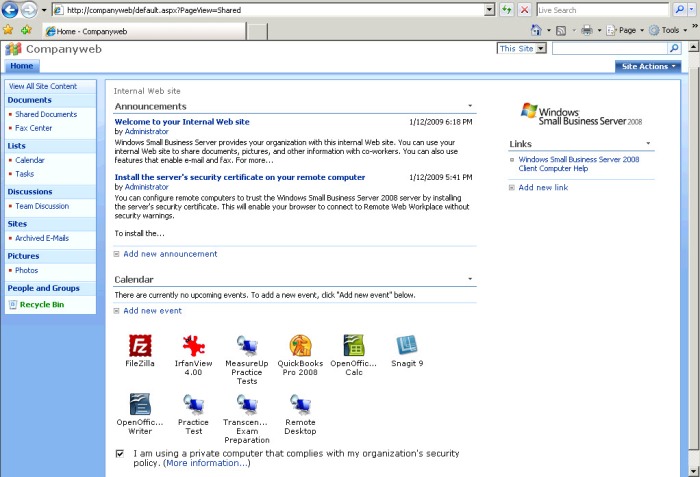
You’re done. You should have the TS Web Access Web Parts on your Companyweb.
Stan,
Great step by step. My TS web is in the Default Web Site group. You mention that this should be moved to SBS Web Application for access from the public internet. I can’t seem to find anything on how to move the TS web, can you tell me?
jim
jim
July 31, 2009 at 12:07 pm
Jim, I guess “move” was a poor choice of words. You actually have to highlight SBS Web Applications” and select Add Application. Use the exact same Alias Application Pool and Physical Path that are on the TS in the Default Web Site section.
Stan
July 31, 2009 at 3:12 pm
sorry to be a bother.. when i change the web.config file to add the savecontrol line, i get a 500 – Internal server error…
yikes, amateurs should not have administrative rights.
i can ud-do the edit and the site is fine. but i’m stuck again.
jim
jim
July 31, 2009 at 3:23 pm
Hmmm. My first thought is that you might have a typo somewhere, missed a step or didn’t do a step quite right. Please double check everything and if you are still stuck, post back.
Stan
July 31, 2009 at 3:41 pm
Thanks Stan, great guide. Stumbling block for me was when copying and pasting the code for . Turns out the quote marks were a weird font, re-typing them in Notepad and it worked fine.
One other minor thing was giving the computer account access to the Terminal Server which is documented here – http://technet.microsoft.com/en-us/library/cc775344%28WS.10%29.aspx
Nick Lloyd
September 30, 2009 at 11:54 am
[…] https://ecsnetworksolutions.wordpress.com/2009/02/27/using-small-business-server-2008-companyweb-with… Categories: server 2008, terminal services LikeBe the first to like this post. Comments (0) Trackbacks (0) Leave a comment Trackback […]
Adding TS Web to SharePoint « ncdlloyd
March 1, 2011 at 11:29 pm